Quack Engine
A cross-platform 2D game engine for Windows and PS5, built by a team of five. I owned the rendering, the asset pipeline from offline build tool to runtime loading, the virtual file system, and the project and build setup.
- Team
- 5 programmers
- Platform
- PC, PS5
- My Role
- Rendering, assets, build

Quack Engine is a cross-platform 2D game engine built by a team of five for a university module, that can run on Windows and PlayStation 5. Each member of the team had responsibility of different systems. Mine were:
- Rendering: a Rendering Hardware Interface (RHI), a batched 2D renderer, and MSDF text rendering.
- Asset management: an offline Asset Build Tool, a custom
.pakformat, and the runtime asset manager. - Virtual File System: a mask over the platforms file system making operations more consistent and helpful for the runtime asset system.
- The window and application layer, and the project layout and build setup that link everything together.
The rest of the team built the physics, audio, input, and the scene and component systems on top of these.
Architecture
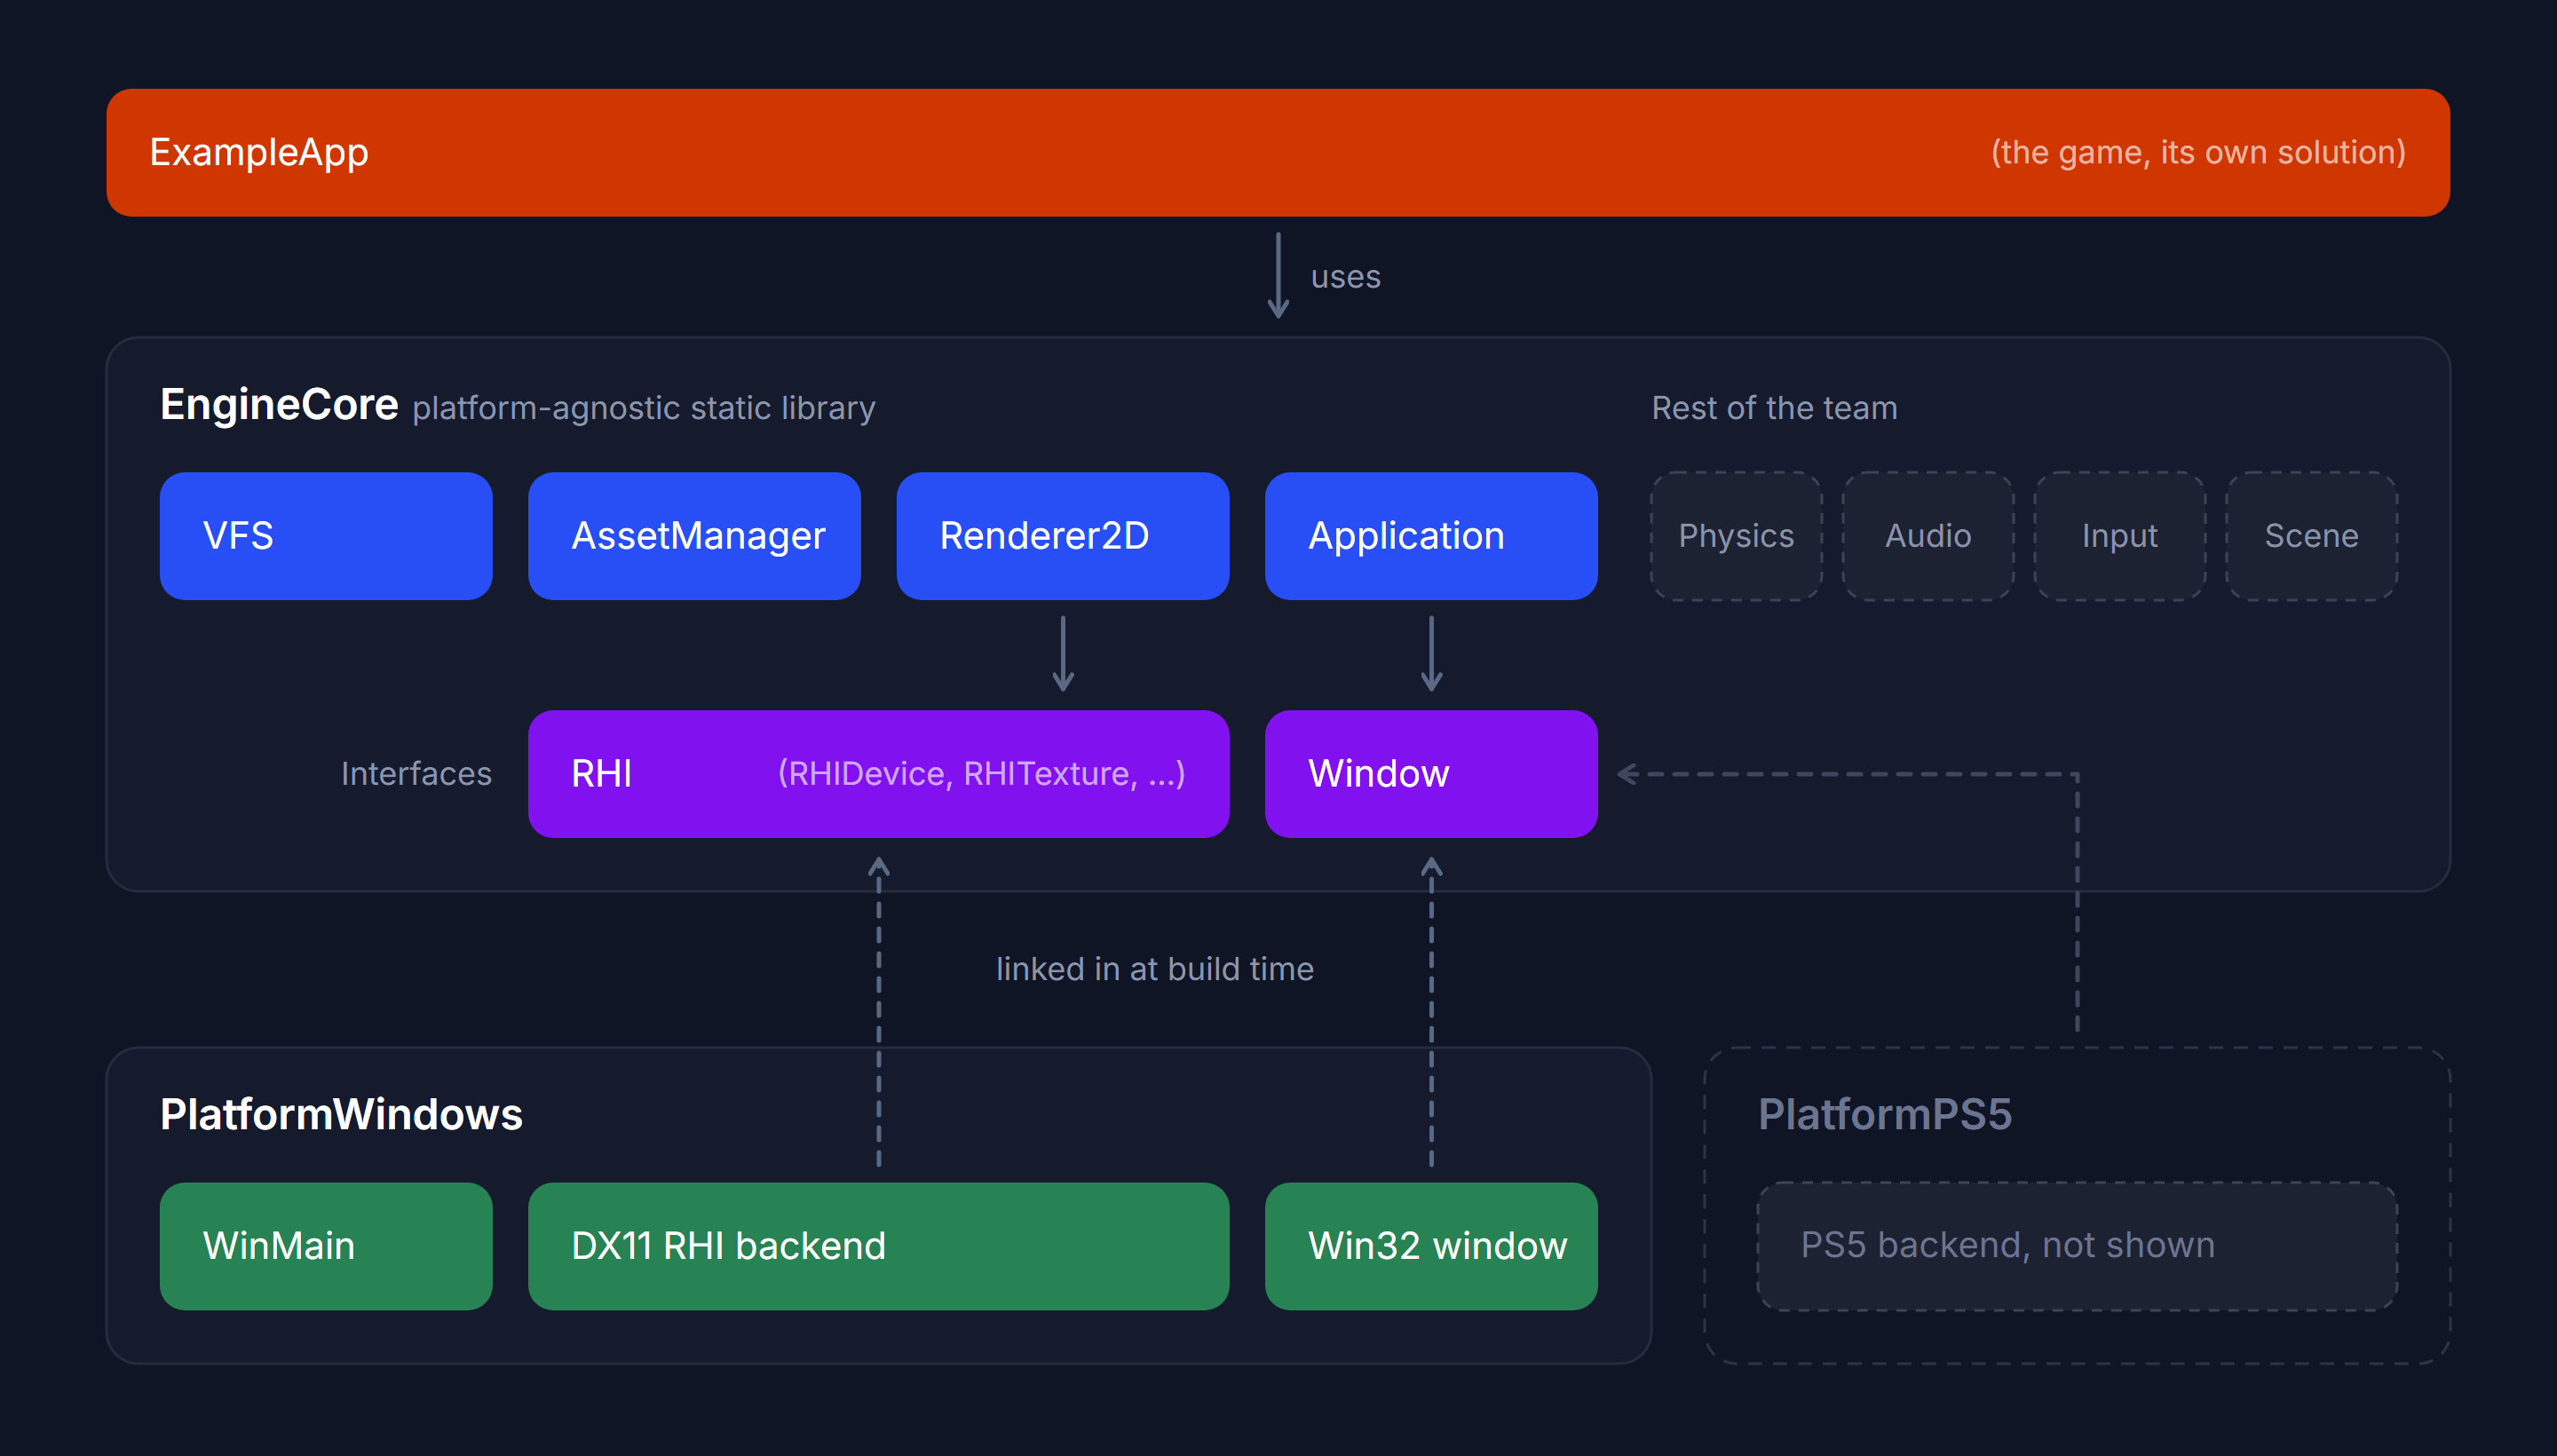
The aim was that engine and game code should never need to know which platform it is running on. Rather than scattering #ifdefs through the code, the engine is split into separate static libraries:
- EngineCore holds everything platform-agnostic: the renderer, asset manager, VFS, scenes, physics and so on. It only talks to abstract interfaces such as
WindowandRHIDevice. - One platform library per platform (
PlatformWindowsandPlatformPS5) implements those interfaces, and provides the program entry point. - The game is a separate application that links against EngineCore plus the platform library for whichever platform it’s building for.
The platform library plugs itself in at link time. Each interface has a free factory function declared in EngineCore, and the platform library defines it. For the render device, a macro does this in one line:
#define REGISTER_BACKEND_DEVICE(BackendDeviceClass) \
RHIDevice* Quack::Rendering::CreateDevice(Quack::Window* window) { \
	RHIDevice* device = static_cast<RHIDevice*>(new BackendDeviceClass()); \
	device->SetWindow(window); \
	if (!device->Init()) \
		return nullptr; \
	return device; }
REGISTER_BACKEND_DEVICE(Platform::Windows::Rendering::DX11RHIDevice);
Windows and PS5 each provide their own CreateDevice, CreateAppWindow and entry point, and the linker picks the a library based on the build config. Apart from one spot in the PAK file loader, the shared engine code builds for both platforms without a single #ifdef.
The application layer
The game never writes a main, it instead make a subclass of Application and registers it using a macro.
class Application
{
public:
	virtual ~Application() {};
	virtual void Init(Rendering::Renderer2D* renderer) {};
	virtual void Update(float deltaTime) {};
	virtual void Render() {};

	std::vector<Scene::Scene*> m_scenes;
	Scene::Scene* m_activeScene;
	VirtualFileSystem m_vfs;
};

#define ENGINE_CREATE_APPLICATION(AppClass) \
Quack::Application* CreateApplication() { return new AppClass(); }
The platform’s entry point (WinMain on Windows) just calls EngineMain(). That creates the window, mounts the engine’s asset pack, starts input and the renderer, and then runs the game loop.
Rendering
The RHI
Writing every rendering feature separately for DirectX 11 and the PS5’s graphics API would mean doing the work twice. It also makes it harder to keep them in parity so everything looks the same on all platforms. Instead, the engine has a Rendering Hardware Interface which is a layer of GPU concepts (devices, swapchains, buffers, textures, shaders, pipelines, command lists) that each platform implements once. Everything above it, like sprite batching and text, is written once using the RHI API in a higher level renderer.
I based the RHI’s design on a mix of DirectX 11 and DirectX 12. It has DX12-style command queues and command lists and whole-pipeline state objects, but keeps DX11’s simpler resource binding. I chose this way because it means more explicit APIs can fit into it without too much trouble and simpler APIs can implement parts they dont have.
Every resource is created through the device using public Create functions, each backend just has to override a private factory method:
RHITexture* RHIDevice::CreateTexture(const TextureDesc& desc)
{
	RHITexture* texture = CreateTextureImpl(); // backend makes its own type such as DX11RHITexture

	if (!texture->Init(this, desc))
	{
		return nullptr;
	}

	return texture;
}
Batched 2D rendering
On top of the RHI sits Renderer2D, which is the API the game and components use for rendering. It exposes DrawBox, DrawLine, DrawCircle, DrawTexture, DrawTextureRegion (for sprite sheets) and DrawText functions. None of these draw anything straight away, instead each one appends vertices to an array, and the whole thing goes to the GPU in as few draw calls as possible when the frame ends.
To batch sprites with different textures together, each vertex carries a texture index, and the pixel shader has 16 texture slots bound at once. Slot 0 is always a 1 by 1 white texture for shapes that use a colour instead of a texture. When a texture is drawn, the renderer looks for it in the slots already in use, and only adds it if it’s new.
The vertex buffer grows to double the needed size when a batch doesn’t fit, and textures are uploaded to the GPU once and then cached against their asset.
For the windows platform side, I went with DirectX 11 as the API which unfortunately cannot index an array of textures with a value that comes from the vertex data. So instead, the shader picks the texture with a switch:
Texture2D textures[16] : register(t0);

float4 SampleTexture(float index, float2 uv)
{
    switch ((int)index)
    {
        case 0: return textures[0].Sample(samp, uv);
        case 1: return textures[1].Sample(samp, uv);
        // ...one case per slot
        case 15: return textures[15].Sample(samp, uv);
    }

    return float4(1, 0, 1, 1);
}
MSDF text
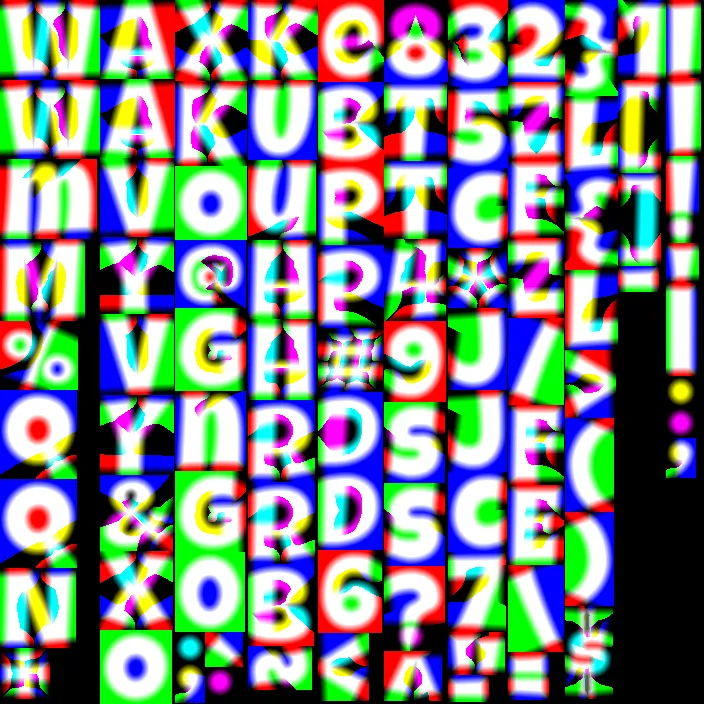
For the text rendering I decided to go with multi-channel signed distance fields (MSDF). Rather than storing each glyph as pixels, the font atlas stores the distance to the glyph’s edge across three colour channels (this is also more accurate than valve’s one channel SDF text rendering). The median of the three channels in then used.
float median(float r, float g, float b)
{
	return max(min(r, g), min(max(r, g), b));
}

float4 PS_main(PS_Input input) : SV_TARGET
{
    uint texIndex = (uint)input.texIndex;
    float3 msdf = SampleTexture(texIndex, input.uv).rgb;
    float pxRange = screenPxRange(texIndex, input.uv); // how many screen pixels the distance range covers

    float dist = median(msdf.r, msdf.g, msdf.b);
    float opacity = saturate(pxRange * (dist - 0.5) + 0.5);

    return float4(input.color.rgb, opacity);
}
The atlas and glyph metrics are generated offline by the Asset Build Tool (see Font processing). Also similar to rendering sprites, text is also batched but in a separate array as it uses a separate shader.

Asset pipeline
Loading raw files at runtime is simple, but it means the runtime does things like shader compilation and image decoding every time the game starts, and the raw files differ between platforms. The engine instead splits assets into two stages: an offline Asset Build Tool that turns source files into ready-to-load data and packs them into a single .pak file, and a runtime asset manager that loads this file and allows the data to be accessed in the application.

The Asset Build Tool
The Asset Build Tool (ABT) is a standalone command line tool that takes one or more input folders and an output folder. A single build is made up of four stages:
- Initialise: parse the arguments and register the processors.
- Scan: walk every input folder recursively. Each file’s path relative to its input folder becomes its virtual path in the pack, and duplicate paths across folders are shown as warnings in the output.
- Process: give each asset to the first processor that can handle it.
- Package: finish off the
.pakfile.
Assets can have an optional .meta JSON file beside them for extra settings. An example of this is shaders which use it for their entry point and target profile:
{
	"entry": "PS_main", // the shader's entry point function
	"target": "ps_5_0" // what compiler/version should be used (here it is a pixel shader using shader model 5.0)
}
Asset processing
Every asset type has its own processor which just has to implement a simple interface:
class IAssetProcessor
{
public:
	virtual ~IAssetProcessor() = default;

	virtual bool CanProcess(const std::filesystem::path& path, const AssetMeta& meta) const = 0;
	virtual bool Process(const std::filesystem::path& input, const AssetMeta& meta, std::vector<char>& output) = 0;
};
| Processor | Input | Output |
|---|---|---|
| Image | .png, .jpg, .bmp |
decoded pixels with a small header, so no image decoding at runtime |
| Shader | .hlsl |
compiled bytecode, using the entry point and profile from the .meta file |
| Font | .ttf, .otf |
an MSDF atlas plus glyph metrics (advance, bearing, atlas UVs) |
| Sound | .mp3, .wav |
an FMOD sound bank, built with FMOD’s FSBank API |
| Text | .txt, .json, .xml |
copied as-is |
The font processor uses msdf-atlas-gen which it runs as a child process. It reads back the atlas image and the JSON the generator writes and packs both into one binary blob which includes a header, an array of glyphs, then the atlas pixels. At runtime this loads straight into the runtime FontAsset type without any parsing beyond a few memcpys.
The PS5 build had its own shader processor alongside these, which isn’t shown here.
The PAK format
Everything ends up in one .pak file which consists of a small header, each asset’s data back to back, and a directory table of every asset’s path, size and offset.
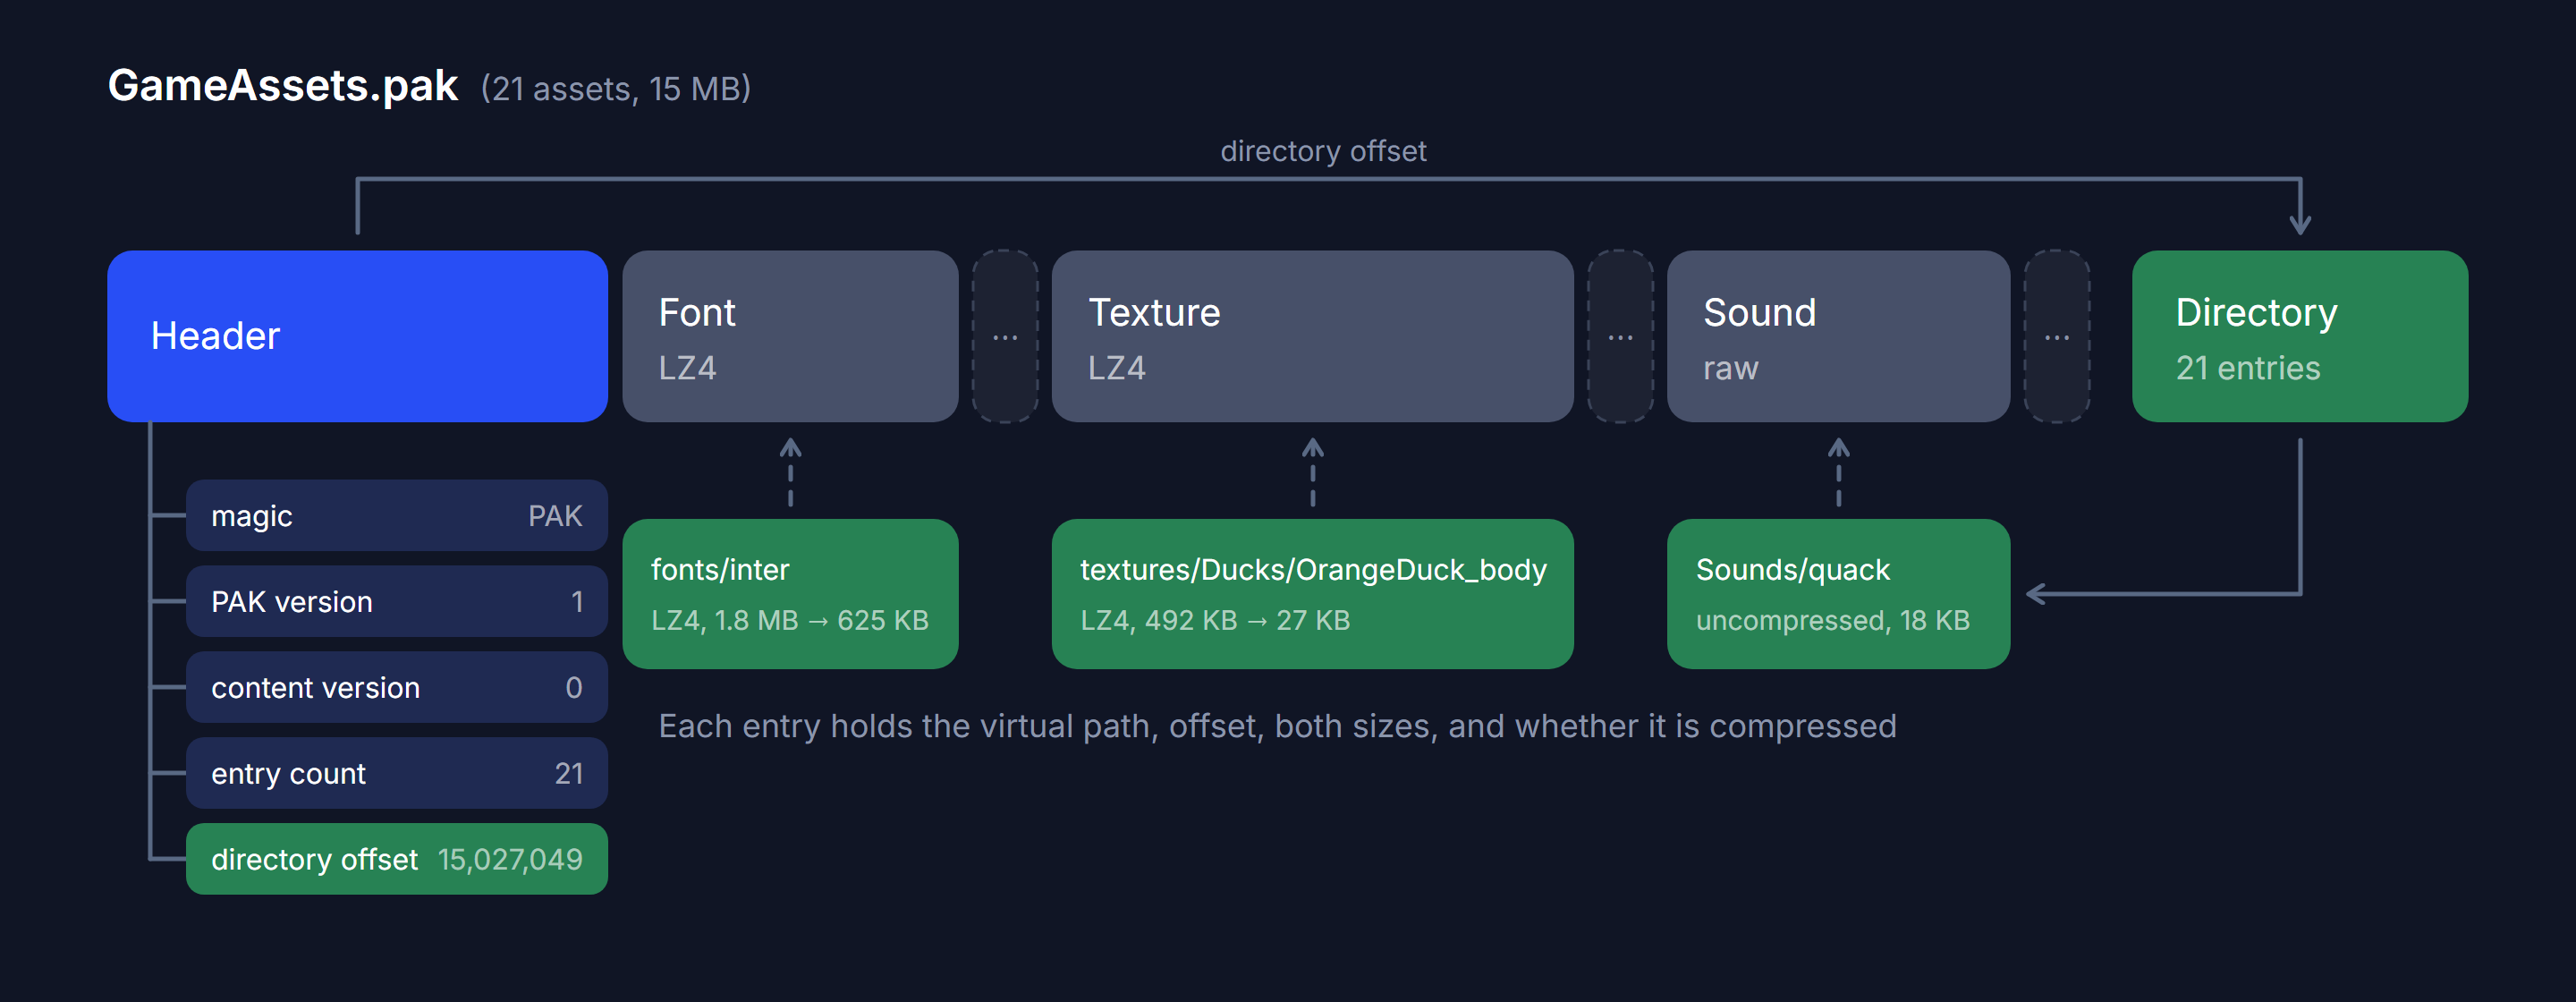
Putting the directory was inspired by this blog. It means the build tool can stream each asset straight into the actual pak file as soon as it’s processed, without holding the whole pack in memory. It skips over the header when it starts, and goes back to fill it in once it knows where the directory begins:
bool PakBuilder::WriteToDisk()
{
	PakHeader header{};
	header.numEntries = (uint32_t)m_entries.size();
	header.pakVersion = kPakFileVersion;
	header.directoryOffset = (uint32_t)m_outputStream.tellp(); // the directory starts where the data ended

	for (const PakEntry& entry : m_entries)
	{
		m_outputStream.write((char*)&entry, sizeof(PakEntry));
	}

	m_outputStream.seekp(0); // go back and fill in the header
	// ...write the header fields
}
Large assets are compressed with LZ4. The idea to do it per asset and not on the whole file was also inspired by the blog I mentioned previously as it allows you to read one compressed asset without decompressing the whole file. I chose LZ4 because it decompresses very quickly which was more of a priority over file size. Small files are stored uncompressed, as they gain little from it and would still pay the cost of decompressing.
Virtual file system
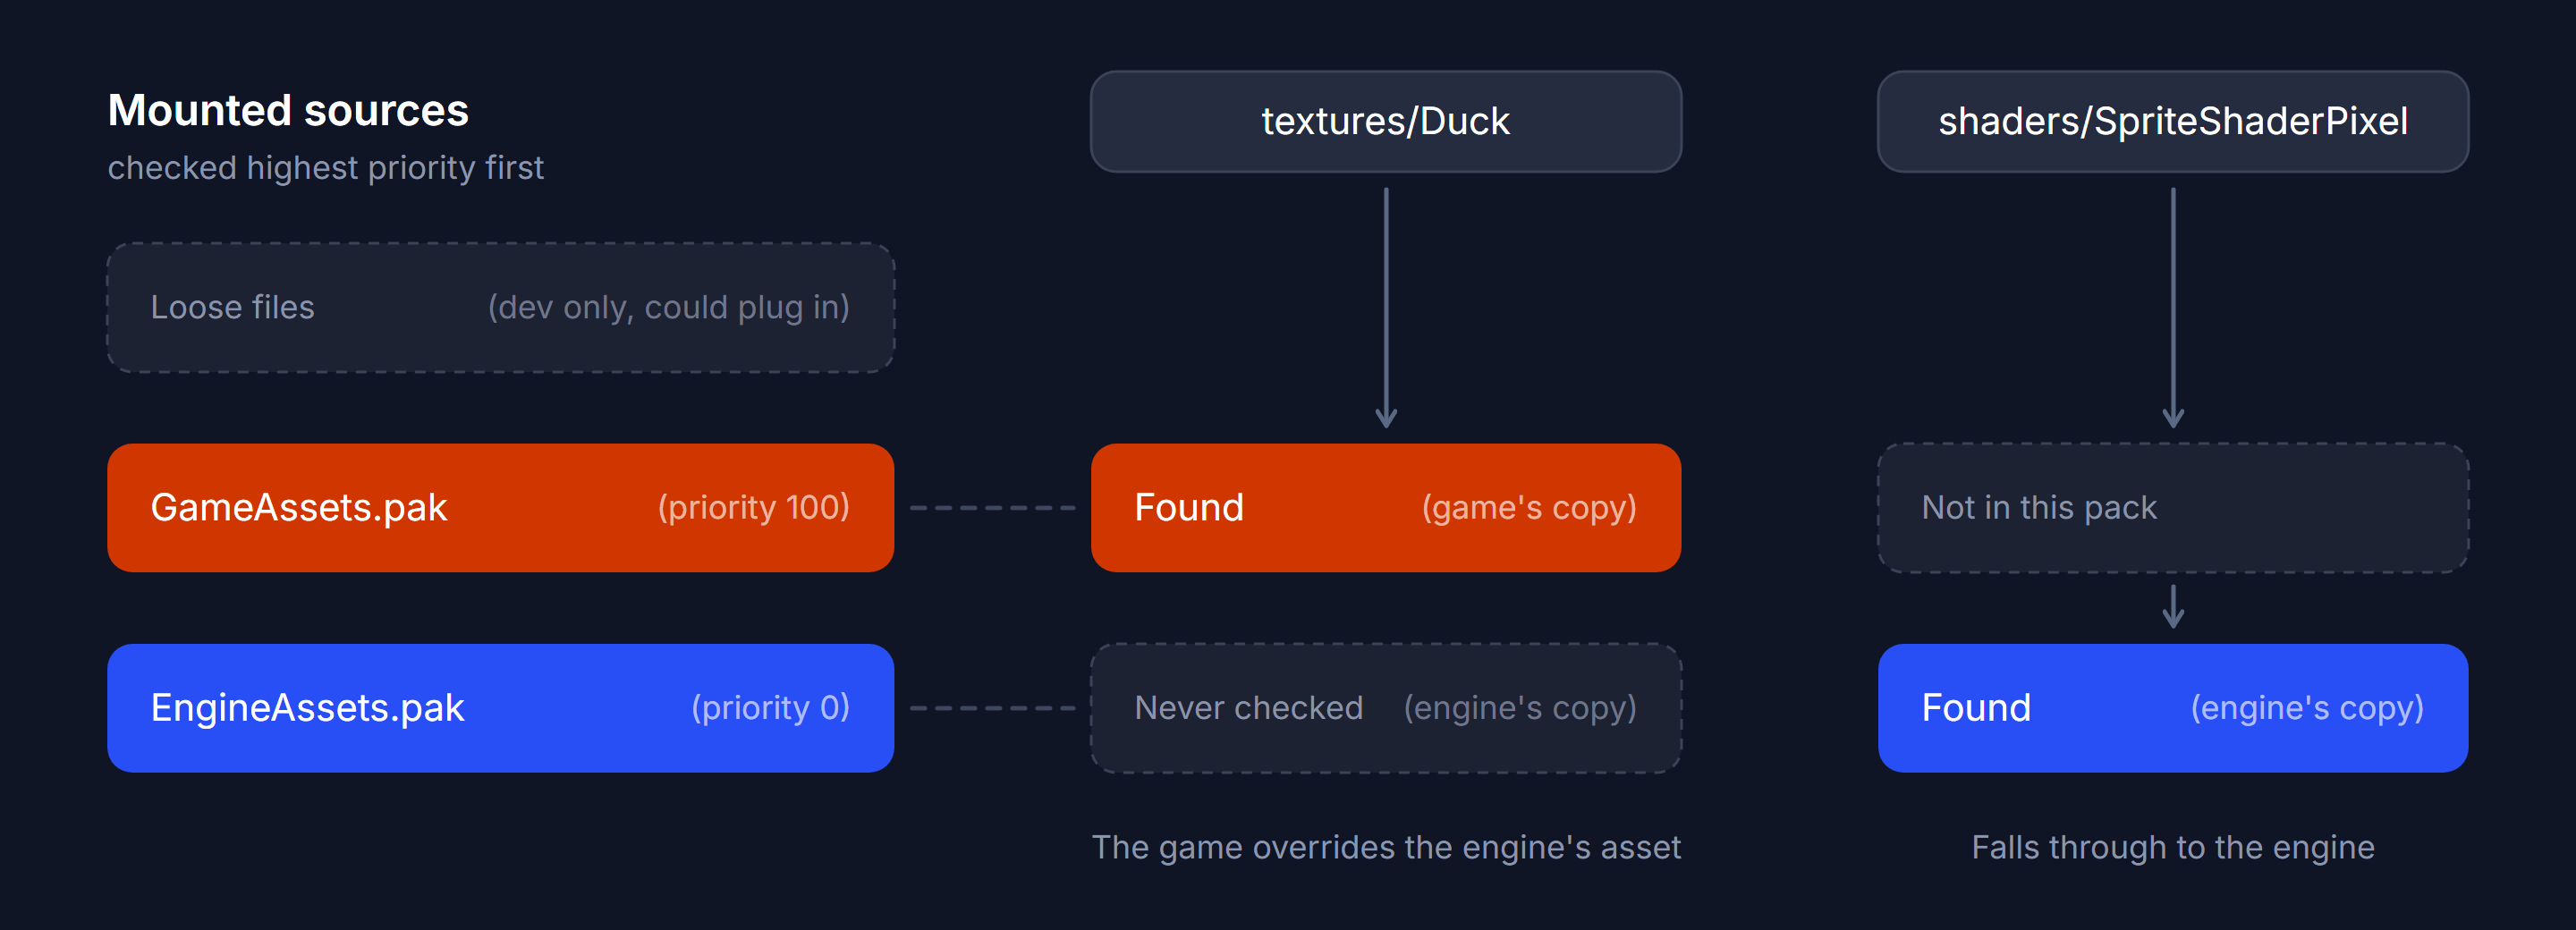
The asset manager doesn’t read the .pak file directly. It reads through a virtual file system (VFS) that can have several sources mounted at once, each with a priority. Every source implements the same interface:
class IFileSystem
{
public:
	virtual ~IFileSystem() = default;
	virtual bool FileExists(const std::string& path) const = 0;
	virtual bool ReadFile(const std::string& path, std::vector<char>& outData) = 0;
};
PakFileSystem is the implementation for .pak files. When mounted, it checks the header and loads the directory table into a map, so FileExists is a single lookup and ReadFile is a seek, a read, and a decompress if needed.
To allow overriding, mounts are kept sorted by priority, and a read goes to the highest-priority source that has the file. The engine mounts its own EngineAssets.pak at priority 0, and the game mounts GameAssets.pak at priority 100. That means a game can override any engine asset just by including a file with the same path. Other benefits are mod folders or a loose-file source during development so artists don’t need to rebuild the whole PAK file when changing an asset.
Runtime asset management
The game loads everything through one call:
AssetHandle<TextureAsset> duck = AssetManager::Load<TextureAsset>("textures/Duck");
Load<T> reads the bytes through the VFS, turns them into a runtime asset, and caches the result so that next time it is just a lookup into a map. The type parameter decides how the data is parsed, using a template specialisation of AssetParser for each asset type. The base template does not compile so trying to load a type with no parser errors in the build:
// base asset parser template
template<std::derived_from<Asset> T>
class AssetParser
{
public:
	static T* Load(std::vector<char>& data)
	{
		static_assert(sizeof(T) == 0, "No AssetParser has been implemented for this type");
		return nullptr;
	}
};

// template specialisation for a font asset
template<>
class AssetParser<FontAsset>
{
public:
	static FontAsset* Load(std::vector<char>& data);
};
All parsers do is turn bytes into plain data, they don’t create GPU textures or FMOD sounds. That part is left to whatever uses the asset so those more expensive operations happens when that system decides. This also means asset loading doesn’t need to depend on the renderer or the audio engine.
Asset handles
Load returns an AssetHandle<T> rather than a raw pointer. Handles are reference counted where copying one adds a reference and destroying one releases it. The cache holds a reference of its own so assets stay loaded until AssetManager::Clear(), after which each asset is freed as soon as the last handle to it goes away.
I wrote this rather than using std::shared_ptr due to a recommendation from my university lecturer as he said the benefit is the count lives inside the asset itself and there’s no separate control block to allocate or follow. The count isn’t atomic since the engine is single-threaded but this would be an easy change if multi-threading was ever done.
Project layout and build
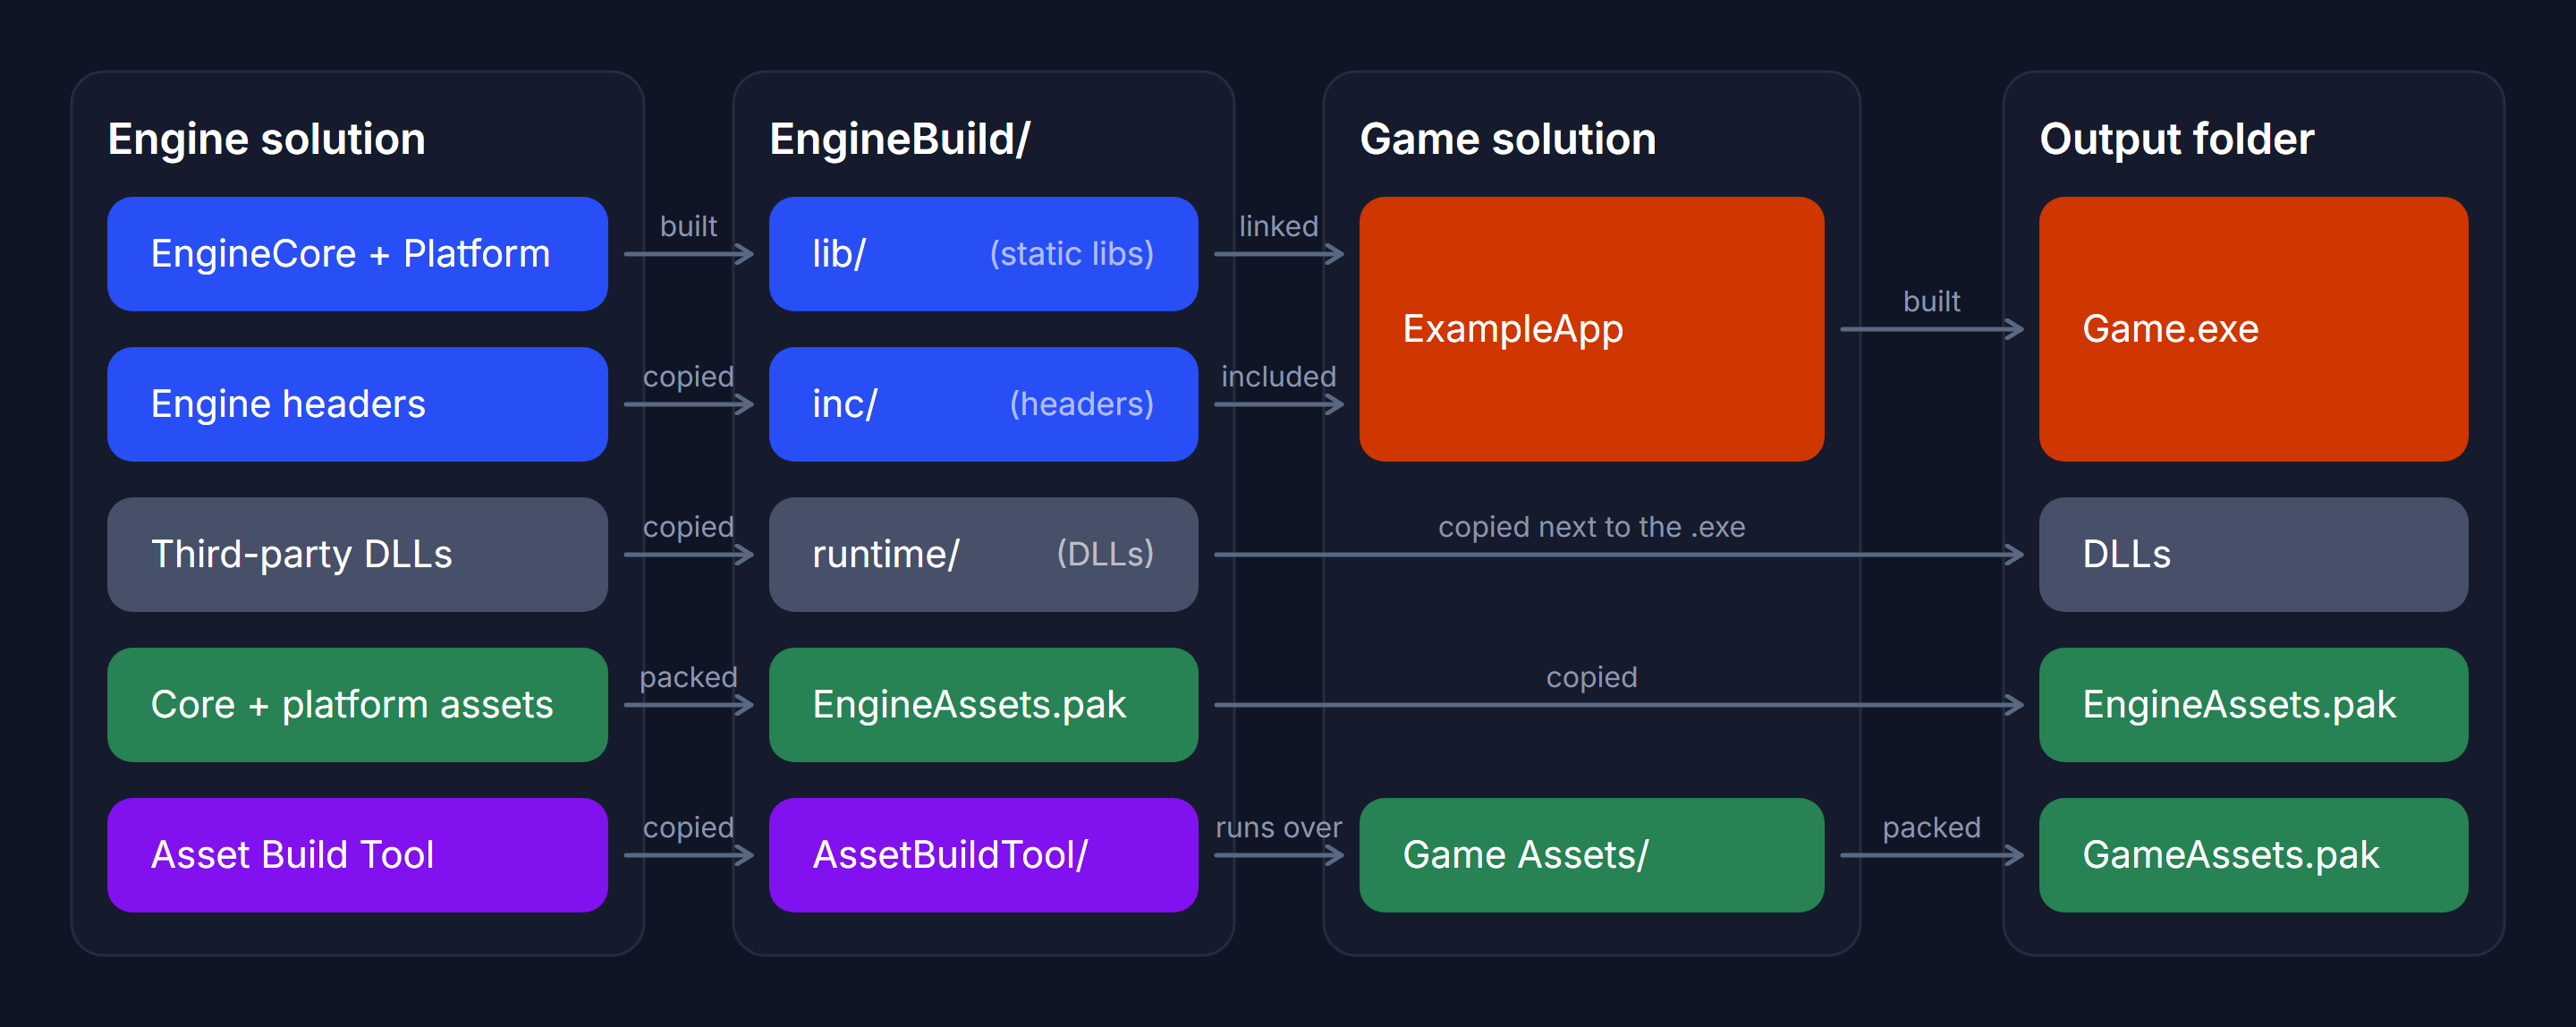
The engine solution is split into Engine (EngineCore, the platform libraries and third-party code) and Tools (the Asset Build Tool). The example game isn’t part of it at all and has its own solution that copies and loads the engine.
To make that work, building the engine produces an EngineBuild folder with everything a game needs, laid out per configuration and platform:
EngineBuild/
├── AssetBuildTool/        the build tool, so games can pack their own assets
└── Debug_x64/             one folder per configuration and platform
    ├── inc/               engine headers, plus third-party and shared ABT headers
    ├── lib/               EngineCore and PlatformWindows static libraries, and EngineAssets.pak
    └── runtime/           DLLs the game needs next to its .exe
MSBuild targets do the work around each compile. Before the engine builds, it runs the Asset Build Tool over the engine’s shared assets and the current platform’s assets (shaders differ per platform as you cant use something like SPIR-V for PS5) to make EngineAssets.pak. The headers, libraries, runtime files, and the ABT are then copied into EngineBuild. When the game builds, its own target copies in the engine libraries and runtime files, and runs the same tool over the game’s Assets folder to make GameAssets.pak. Switching the platform in Visual Studio switches every one of these paths, so the same project builds for Windows or PS5.
Looking back
- Batching limits. Draws dont have any layer or depth sorting beyond the order you submit them in. Also text always draws after all sprites, so it can’t sit behind anything. This wasn’t important in making the example game so it was never added but would be useful in an engine.
- No bindless textures. Due to DirectX 11 being used it limited the number of textures and also required a
switchin the shader code. DirectX 12 would allow for bindless resources. - Asset type checking. You can load any asset as whatever type you want. If it is the incorrect type then the loaded asset data will likely be a mess. This could be fixed by putting something at the start of every asset representing what type it is.
- Builds always start from scratch. The Asset Build Tool rescans and reprocesses every asset on each build. That was fine at this project’s size, but for a real game I’d add incremental builds (only rebuild assets whose source has changed, tracked by timestamp or hash), and process assets in parallel, since they don’t depend on each other.
- Synchronous loading. Every load blocks the main thread. Asynchronous loading through a job system would let a game load the next level in the background.
- CMake instead of Visual Studio projects. Setting the build up directly in Visual Studio’s project settings caused a lot of problems. Every project needed its include paths, libraries and output folders set by hand for each configuration and platform, and anything the settings couldn’t do, like packing assets or assembling the
EngineBuildfolder, had to be written as custom MSBuild targets full of copy and exec steps. CMake would have been a much better option for doing this.